How to Make a Wooden Remote Control Holder
My aim with DIY projects around the home is to look for innovative space-saving ideas and save costs on materials by recycling.
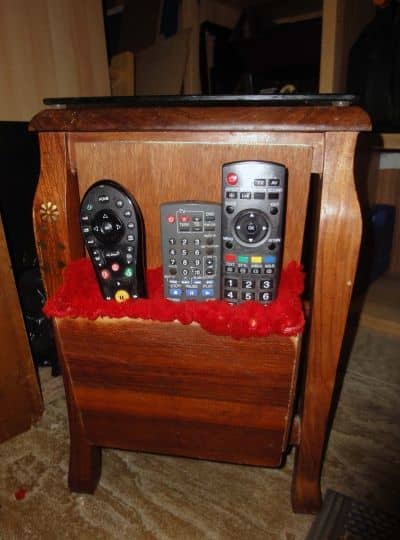
Bespoke Caddy for Remote Controls
Making a Remote TV Caddy From Scrap Materials
Fed up with hunting for your Remote Controls when needed; then perhaps the solution is to make your own bespoke caddy organiser. You can buy these to sit on a side table, and there are a few designs that slip over the arm of your sofa. However, what I was looking for was something that I could conveniently attach to the side of the coffee table, out of the way and still close to hand; so that I could keep the surface of the table free for my coffee and a plate of nibbles when watching TV. Therefore I decided to make my own bespoke box, sourced from scrap materials and which would cost me nothing other than a bit of my time.
For some while I've been a little disconcerted for not always being able to find the remotes when needed; and with most everything being remotely controlled these days I'm sure I'm not alone with this dilemma. You just enter the room to find the TV on in the middle of your favourite programme, or a good film, and want to record it on your Digital TV box or you want to watch a DVD but can't find the remote. It's at these times when an Organiser may hold the answer; assuming of course that the whole family co-operate and put things back after use e.g. a place for everything and everything in its place, as my great grandmother tried to instil into her children.
This article is about how I tackled this issue by knocking up my own bespoke design from scrap materials in my workshop at end of our garden; a quick DIY project that took me just a few hours.
So hopefully this will inspire others who like crafting to have ago; not necessarily using the same materials e.g. if you like sewing then there's plenty of potential to make something similar from curtain material and stiffen it with a bit of hardboard sewn into the back.
Deciding on a Design
Influenced on where and how you intend to fix your TV Remote Caddy
I ruled out making a standalone box similar to what you can buy in that it would just take up too much valuable floor or table space and get in the way or be placed somewhere out of reach where it wouldn't get used.
The most convenient place where it would be to hand for the whole family and where it wouldn't be in the way is the side of a coffee table. In this case one of a nest of tables we use in the living room. This was my ideal solution as it uses what is otherwise wasted space which doesn't get used for anything else, and it wouldn't take up any more space in the living room. In fact by keeping the remotes in a bespoke holder actually saves valuable space as they're not themselves cluttering up valuable space on the coffee table; with one added bonus that it keeps them out of the way neat and tidy when not in use.
Therefore my design is based on making an organiser which fits snuggly into the otherwise wasted space between the legs of a coffee table. On making my preliminary measurement the available space between the table legs is 9 inches (230mm). Each remote we have are 2 inches wide (50mm). So allowing for spacing there is ample room to fit three side by side, which is the number we currently have; one for the television, one for the Tivo Cable TV box and one for the surround sound system and DVD player; so an organiser for three is just right.
The other requirement for the design is for something that is not permanently fixed, or semi-permanent e.g. screwed to the table legs but rather a box which can be easily located in place and quickly removed when required, such as for cleaning, dusting and polishing the table legs, or if at any time we decide to attach the box to another table side. Therefore I also wanted the design to be adaptive so that with little or no tweaking it could be fitted to any table of a similar size.
For a rigid design and so as not to damage or mark the coffee table in anyway my preference for this DIY project was for a wooden box design to fit between the legs, using the leg supports and table top support as a way of holding the wooden box in place without marking or damaging the table.
Alternative Ideas and Materials for making a Remote Control Holder
You could make a bespoke caddy from a wide variety of materials such as canvas or an old curtain. Sow individual pockets (one for each remote), weight the bottom of the canvas and sow a piece of hardboard or thin plywood inside as a firm backing. Then sew a wood or wire coat hanger in the top; the coat hanger providing a method to hang the caddy organiser and make it more rigid at the top. Fitting a hook just under the edge of the table top would provide somewhere from where to hang it, if you're happy to screw a hook into your table. Otherwise you may wish to fasten it to the wall just behind the sofa, although this may be less convenient to use.
Sourcing the Materials
Recycled materials
Having decided on a wooden construction, a simple design that doesn't need much wood and with plenty of small bits of scrap wood in my workshop it was just a case of choose the pieces I wanted to use. So time for a coffee break where I could sit in my shed and select the best bits; the items I chose for this DIY project were:-
- An old coffee table top, 10mm plywood (just under half an inch thick) for the front and back.
- Some spare 3mm plywood for the sides and as part of the extended back as a simple means for support when located in place.
- A small bit of pine floorboard for the base, and
- A piece of wood from a broken magazine rack as a locking rod at the back, to hold it in place between the coffee table legs.
The interior would need to be padded to gently but firmly hold the remotes in place and stop them from flopping about. A few years ago I'd dismantled an old armchair salvaging anything worthwhile such as the red upholstery fabric and furniture foam padding, and then burnt or otherwise disposed of what was left; this fabric and foam padding would be just right for the job. And by using all these scrap materials it didn't coast me a penny, just a few hours of my time.
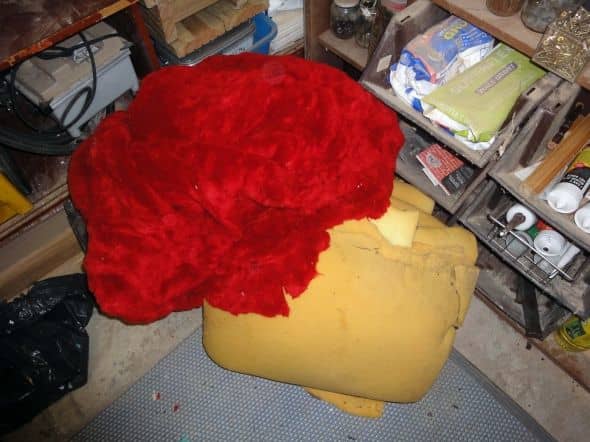
Recycled furniture foam padding upholstered material
Making the Measurements
Measure carefully and make any necessary calculations
The width between the legs of the coffee table where I intended to fit the caddy is 9 inches (230mm). With the three remote, each 2 inches wide (50mm), and the side of the wooden box being be 3mm plywood (combined thickness about inch). As it's not intended as a permanent fixture but something I can lock into place and release easily when wanted I allowed for about inch (12mm) leeway. Therefore the remaining width available for the interior is about 8 inches (210mm); which leaves about inch (12mm) between each device when all three are stored, which is just ideal.
For the depth of the box, the devices vary in thickness from 25mm (I inch) and 35mm. The foam I used is 10mm thick and being filled on both interior sides gives a combined depth of 20mm; the upholstery adds just a few millimetres to this. With the foam being spongy I wanted a tight but not too tight a fit so each device is firmly held but easy to insert and remove when required. For this I calculated the ideal interior width should be about 45mm at the base and 50mm at the top.
For the interior height all three of our devices are different heights ranging from 7 inches (180mm) to 9 inches (230mm); therefore I decided on 5 inches (130mm) as the optimum height.
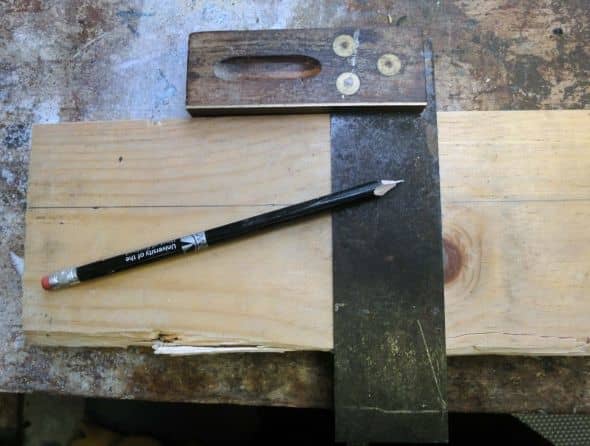
Measuring the wood
Step by Step Guide on Construction
Made from wood and padded with recycled foam and upholstery material
Having made all the necessary measurements, deciding on the design and sourcing all the required materials it was just a question of cutting the wood, assembling, fitting the foam padding and upholstery material and giving it a test run. Below is a simple guide to its construction.
- Measure mark and cut the base from a piece of wood (in this example 21mm thick pine floorboard) measuring 210mm (8 inches) by 45mm (just under 2 inches). I cut one of the sides at a slight angle so the front would slope out by 5mm (1/4 inch) over the 130mm (5 inch) height. I'm no good at geometry so I did it by eye and got it pretty much spot on but I guess the angle of the cut is somewhere between 5 degrees and 10 degrees?
- Cut the front and back to width, 210mm (8 inches) and 180mm (7 inches) high; which is 50mm (2 inches) higher than the interior height to allow for the thickness of the base and to create a recessed area under the base of the box to slop over the coffee table leg support, as shown in the photo below.
- Glue and pin the front and back to the base support (using wood glue and a nail gun), so that the interior height is 130mm (5 inches) and a gap is left under the base for when the box unit is placed over the table's leg support.
- Place the glued front and back over the plywood intended for the sides to use as a template for marking and cutting the two ends. Only cut these down to the 130mm (5 inch) height of the interior rather than the full 180mm (7 inches) so the side panels don't prevent the box from resting over the legs support when it comes to locking in place.
- Cut side panels, then glue and pin them in place.
- Measure and cut the foam to fit all around the interior of the box. Push the foam in place and pin it at the top with a few staples. Once stapled at the top the natural friction from the foam will keep it in place so there is no need to secure it at the base in anyway.
- Using a generous quantity of upholstery material (more than needed), starting from the centre of the material push it into the interior of the box, to fill the whole box reaching to the bottom and corners. When in place cut the surplus leaving a couple of inches (50mm) spare all round. Tack in place with upholstery nails, placed close to each other at regular intervals e.g. so that they are touching each other. Once the upholstery material has been securely nailed into place cut the surplus material; as the box is only two inches wide pulling the corner of the upholstery material across from one side to the other (so its tucked in) firmly holds the material securely on the sides. If you're not sure how to do this then use thicker side panels so that you can also nail the upholstery material around the two sides.
- Add a backing to the box which will be tall enough so that the top of the back will rest against the outside of the upper support for the table top. The backing doesn't need to be thick and heavy so a piece of 3mm plywood is ideal.
- Fit some mechanism such as bolts or latches on the back, to either side such that when bolted in place it locks it in place against table legs. With this design the caddy slopes slightly outwards from the bottom up so you will need to give it a test fit to determine the best spot for locating the bolts, for the one I made it was just under halfway up the back. To hold and grip the back of the table legs I chose to use a single wooden spindle that pivots at the centre so once the box is located in place under the table I could just turn the spindle into the horizontal position to grip both legs in one go.
- With my design I deliberately wanted the gap under the base wider than the thickness of the leg support to give some leeway when fitting in location, and to give a little more versatility so that it would fit a wider range of tables of a similar size. This can make the unit a little floppy when first fitted but a small L shape bit of wood can be easily cut to size to slip in under the base and rest on the table leg support to act as a wedge and make the fitting tight. If I wanted to make the fitting more permanent it would be easily to fit a piece of beading under the box's base so that it engages in place snuggly giving a tight fit without the need for a wedge.
- Dry test and make any necessary tweaks as appropriate and if satisfied clean up the surfaces and either wood stain, varnish or paint to taste, which is what I will do once the box unit has been given a good trial run.
Visual Guide to Making the TV Remote Caddy

Recycled furniture foam padding and upholstered material
Whether to Buy or Make Your Own
Remote Caddies on Amazon
This content is accurate and true to the best of the author's knowledge and is not meant to substitute for formal and individualized advice from a qualified professional.
© 2012 Arthur Russ
Arthur Russ (author) from England on June 16, 2017:
Thanks all for your comments; greatly appreciated.
anonymous on April 15, 2013:
It seems like there is not a wood working problem you can't solve and teach others, another excellent DIY by you and FB loved! :)
Pam Irie from Land of Aloha on January 28, 2013:
Wow! You showed innovation and frugalness in making your own remote control holder. Nice page!!!
DecoratingMom411 on January 16, 2013:
A remote control holder is a great idea.
kabbalah lm on December 24, 2012:
I'm not handy. I'd probably cut my fingers off trying to make one
Marika from Cyprus on December 21, 2012:
Great info on making a remote control holder. Love the pics! Blessed.
How to Make a Wooden Remote Control Holder
Source: https://discover.hubpages.com/art/how-to-make-a-remote-control-holder